How to Troubleshoot New Balance QC Photos Missing Key Angles
# How to Troubleshoot New Balance QC Photos Missing Key Angles When a product page already shows View QC Photos, but the images don't cover the angles needed to check the upper, heel, sole, or size markings, the right goal isn't to decide on a return or exchange based on one partial shot. Instead, first confirm which product the images belong to, then record what evidence is known, flag the gaps, and send the proxy platform a specific request for extra photos. 👟 This article uses a [New Balance
Published Oct 10, 2026 ·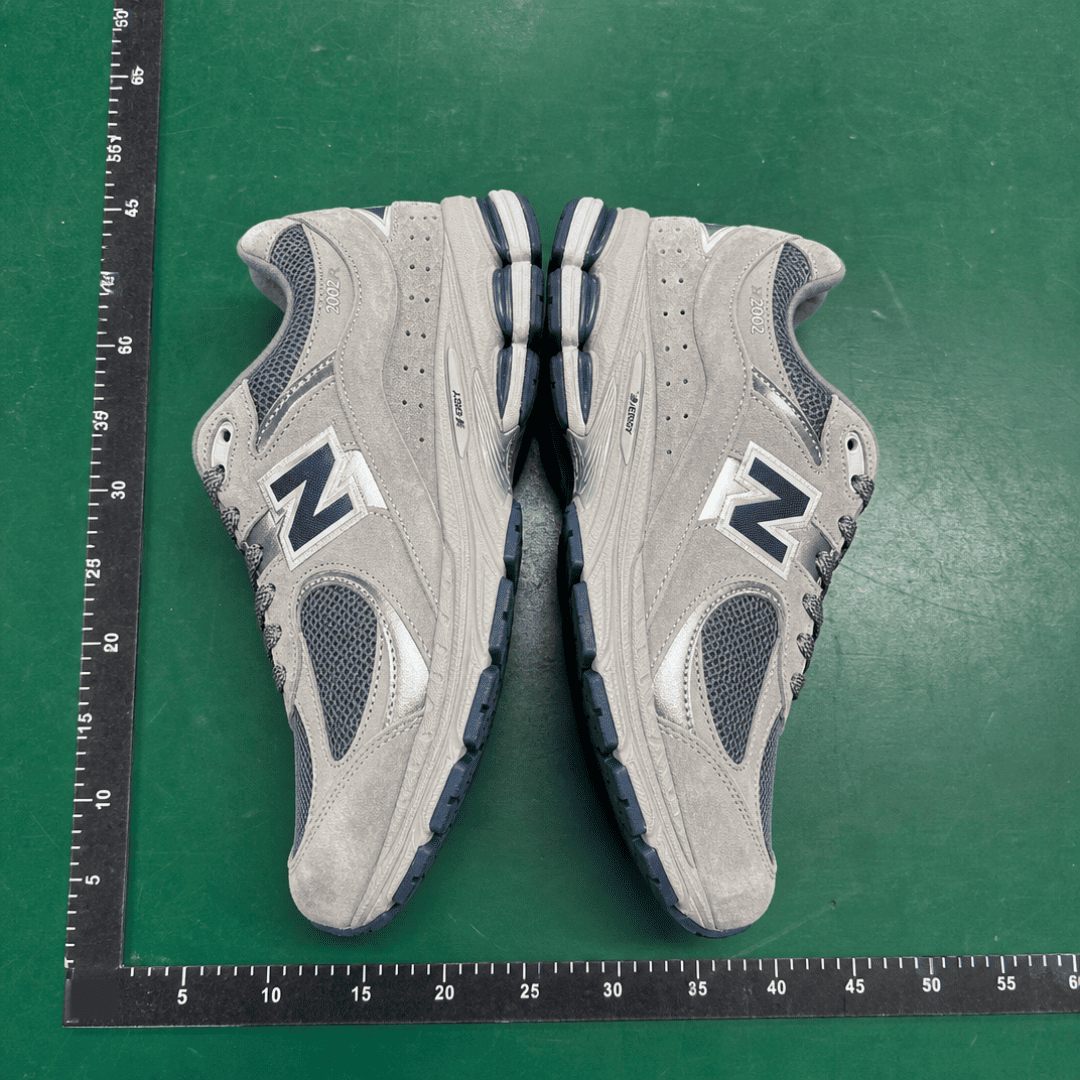
When a product page already shows View QC Photos, but the images don't cover the angles needed to check the upper, heel, sole, or size markings, the right goal isn't to decide on a return or exchange based on one partial shot. Instead, first confirm which product the images belong to, then record what evidence is known, flag the gaps, and send the proxy platform a specific request for extra photos. 👟
This article uses a New Balance ML2002RDA sample product from fashion-reps. According to the product page, it's a 2002R model with pigskin suede, mesh, a T-Beam support structure, and an exposed heel cushioning unit. The listed size range is 36–45. That description comes from the product page or public materials; it doesn't mean the current QC photos have already proven every detail is perfect.
After reading, buyers should be able to do three things: confirm whether the QC photos really match this pair of shoes, judge which issues are just missing images, and put together an actionable photo request. This article doesn't apply when there's no product detail page, no View QC Photos entry, images can't be matched to the product, or a professional authenticity check is needed. QC photos can only help verify visible appearance; they can't replace authenticity verification or a quality guarantee.

Image: QC reference image for the New Balance ML2002RDA product related to this article. It's used to illustrate product correspondence and QC check scope, not to guarantee authenticity, durability, or overall shoe quality.
Confirm the Product and Find the View QC Photos Entry from the Product Detail Page
Start from the specific fashion-reps product detail page, not from the home page, brand page, category page, or images of other New Balance products. The current sample is listed as New Balance ML2002RDA, described on the page as a multicolor 2002R with pigskin suede, mesh, and T-Beam support.
To confirm the page identity, record at least the following:
Is the product name New Balance ML2002RDA
Does the product style or color match the style in your order
Is the product size within the range you selected when ordering
Is there an entry called View QC Photos on the page
After opening the gallery, do the images still show the same product name, order, or product context
If you only see main photos of similar styles, or the QC photo page doesn't have enough info to prove it belongs to the target product, pause the visual assessment. Similar 2002R models may share a close silhouette, but colors, materials, labels, and details are not identical.
Record Which Photo Angles Are Provided and Which Are Missing
Don't start by writing "these shoes have problems." Instead, create a photo coverage record. For each image, only note what's directly visible, and mark any parts that don't appear at all as not provided. 👀
| Inspection Area | What Can Be Directly Recorded | What to Do When the Image Is Missing |
|---|---|---|
| Upper | Whether the left and right uppers, toe box, and lace area appear | Request left and right side views and toe close-ups |
| Heel | Whether heel height, heel tab, and heel logo appear | Request left and right heel front views and close-ups |
| Sole | Whether outsole tread, edges, and obvious dirt or damage appear | Request full sole view and close-ups of front and rear tread |
| Size Markings | Whether tongue label, inner label, and shoe box label appear | Request size label, shoe box label, and a photo showing the ordered size together |
The "directly recordable" column only applies when the image actually shows that part. If it wasn't photographed, don't write "this structure is missing." If the angle is insufficient, don't write "stitching is uneven" or "color is off."
For the current sample, the product page info supports background checks on style, material, and structure, but the evidence provided doesn't automatically prove that every upper angle, heel logo, sole tread, or size label has been photographed. If a part isn't clearly visible in the gallery, write it down as "insufficient photo evidence provided."
Organize Evidence by Upper, Heel, Sole, and Size Markings
Upper
Check the upper on both shoes separately, not just one. Focus on toe shape, the seam between mesh and suede, around the lace holes, obvious creases, stains, damage on the forefoot and sides, and any color difference between left and right.
If photos only show a distant side view, you can usually judge only the overall shape and color, not fine stitching, material surface, or printed edges. The product page mentions pigskin suede and mesh, but that's just a material description; whether you can clearly tell them apart in the photos depends on actual clarity.
Heel
Check that both left and right heels appear. Look at heel height, heel tab, logo placement, stitching, and obvious collapse. A one-sided heel or angled photo can't represent the other shoe's heel.
If the heel logo is blocked by the tongue, packaging, or the shooting angle, request a reshoot instead of filling in details based on the shoe's common design.
Sole
A sole check needs to see most of the outsole. Key points are obvious foreign objects in the tread, heavy stains, signs of separation, or shipping damage. A side shot or midsole edge can't replace a full sole view.
The page mentions a T-Beam support and exposed heel cushioning. That's structural info from the product description, not proof that QC photos have verified internal support, cushioning performance, or long-term durability. QC images are usually fine for checking visible appearance, but not for guessing about wear experience. 🧭
Size Markings
Size checks should cross-reference the tongue or inner label, the shoe box label, and the size you selected in your order. Seeing the size range 36–45 on the product page doesn't mean the pair in the warehouse has been confirmed as the right size.
If the size label is blocked, reflective, or too low-resolution, request a clear close-up. Buyers can also ask for a photo of the shoe box label to avoid judging the actual inner label only by the box exterior or order page.
Distinguish Between Missing Photos and Actual Product Issues
This is the most important boundary in QC photo troubleshooting:
The heel wasn't photographed, but that doesn't mean the heel logo is missing
The stitching is too blurry to see, but that doesn't mean it's uneven
Lighting caused color shift, but that doesn't mean the actual color is wrong
There's no sole photo, but that doesn't mean the sole has defects
The size label doesn't appear, but that doesn't mean the warehouse sent the wrong size
One shoe shows creases, but that doesn't mean both shoes have the same issue
Editorial judgment should stay within the visible range of the photos. For example, you can say, "The current photos don't cover the sole fully, so I can't complete the sole check," not "the sole has no problems." You can also say, "The colors in the photos are affected by lighting and white balance, so I can't confirm if they match the target colorway," and not treat the on-screen color as an exact color value.
For communication, break each item into three parts: facts you've seen, evidence still missing, and the decision you'll make after getting more evidence. That helps reduce mistaking insufficient photos for product defects. ⚠️
When to Request More Photos Instead of Making a Judgment
Prioritize requesting extra photos when:
Key parts don't appear at all
Photos show only one shoe, so you can't compare left and right
The shoe label, size label, or box label is blocked
Colors are heavily affected by strong shadows, reflections, or warm light
Resolution is too low to see stitching, prints, or material edges
Areas like sole and heel that usually decide returns or exchanges don't have a full view
There's a suspected flaw, but you can't tell if it's dust, packaging crease, or permanent damage
If the angle difference is minor but you can clearly verify the product, size, and main appearance, you can keep the record and decide later based on the platform's return/exchange window and product restrictions. kakobuy's info shows that regular items have a 120-hour 5-day no-reason return/exchange window after warehouse arrival, but custom, restricted, adult, intimate, food, or items where you asked the warehouse to remove packaging, tags, or accessories may not apply. Whether it applies depends on the platform's current page and that item's status; note the check date.
What to Include in a Photo Request for the Product and Position
A photo request should tell the warehouse which pair, which part, and what angle. Don't just write "take fuller photos" or "check quality." Provide info in this order:
Write the product name: New Balance ML2002RDA.
Include order or product ID info, but don't expose full payment card, passport, complete shipping label, or other irrelevant private details.
State that left and right shoes need to be photographed separately, not just one.
List the missing parts: upper, heel, sole, size label, or shoe box label.
Specify shooting requirements: natural or even lighting, reduce reflections, keep images clear, and frame key parts completely.
For suspected flaws, request close-ups plus a full view showing its location.
Ask that the reshoot keeps the link between the product and the order.
A clear request example: "Please take separate close-up photos for the left and right New Balance ML2002RDA: toe, left and right sides, heel, full sole, inner size label, and shoe box label. Use clear close-ups, and also provide one photo showing the whole shoe." This is just a communication template, not a guarantee the platform can provide every angle.
new balance Recheck Checklist After Receiving Extra Photos
After getting the extra photos, recheck in this order:
First confirm the new photos still match New Balance ML2002RDA and the same order
Check that both left and right shoes appear
Cross-check color, style, and size against your order records
Inspect upper seams, toe, lace area, and obvious stitching
Check left and right heel logos, heel tabs, and stitching for obvious issues
View the full sole and front/rear tread for obvious damage, separation, or heavy dirt
Verify the inner size label and shoe box label match
Record "facts clearly shown in photos" and "items still unconfirmed" separately
Decide to accept, continue asking, or request a return/exchange within the platform's return window and conditions
If key parts remain unconfirmed after new photos, don't treat missing evidence as a pass. You can make one more specific request or evaluate whether to stop the order based on the platform's return policy at that time. QC photos can increase visible information but can't guarantee authenticity, material grade, comfort, or long-term durability. ✅
 By Marieke van DalenEditor-in-Chief
 Marieke van Dalen approves testing schedules, shipping-line timing tests and corrections at CSSBuy Tips. Setting the quarterly test calendar and maintaining the parcel bench log are paired with checking every published timing table against courier receipts. Marieke personally orders at least two agent test parcels per quarter and reviews QC photo sets before publication. Shopping agents, international parcel logistics and apparel sizing form the professional remit, while these duties connect test records and scheduling with the desk's editorial approval work.
Editor score 4.2 / 5